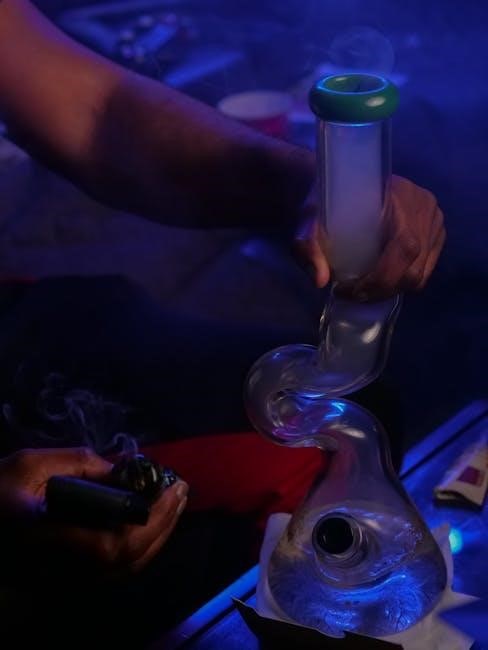
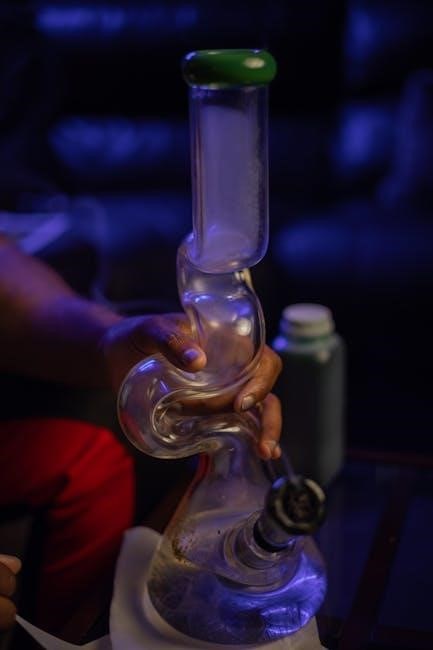
A power bubbler bong combines the smooth filtration of a bong with the portability of a hand pipe, offering a unique smoking experience․ Its auto-draw technology enables hands-free operation, making it a convenient and modern choice for enthusiasts․ Designed for both herbs and concentrates, it delivers flavorful and cooled hits through water filtration, providing a superior alternative to traditional smoking methods․
What is a Power Bubbler Bong?
A power bubbler bong is a modern, portable smoking device that combines the functionality of a bong and a hand pipe․ It features auto-draw technology, allowing for hands-free operation, and includes a water chamber for filtration, a bowl for herbs, and a mouthpiece for inhaling․ Designed for convenience, it offers smooth, cooled hits and can be used with both flowers and concentrates․ Its compact design makes it easy to carry, while its advanced features enhance the smoking experience, making it a versatile choice for enthusiasts seeking portability and efficiency․
Benefits of Using a Power Bubbler Bong
A power bubbler bong offers a unique combination of portability, ease of use, and smooth filtration․ Its auto-draw technology eliminates the need for constant manual operation, providing a hands-free experience․ The water filtration system ensures cooler, cleaner hits, enhancing flavor and reducing harshness․ Compact and lightweight, it’s ideal for on-the-go use while delivering the benefits of a traditional bong․ Additionally, it’s versatile, accommodating both herbs and concentrates, making it a practical choice for smokers seeking efficiency and convenience without compromising on quality or enjoyment․

Components of a Power Bubbler Bong
A power bubbler bong consists of a water reservoir, bowl for herbs, downstem connecting the bowl to water, mouthpiece for inhaling, and auto-draw technology for hands-free use․
The Chamber: Water Reservoir
The chamber, or water reservoir, is the core of the power bubbler bong․ It holds the water that filters and cools the smoke․ Proper water levels are crucial—too low may not filter effectively, while too high can splash into the mouthpiece․ Submerge the downstem fully but avoid overfilling․ Use filtered or distilled water for a cleaner taste and reduced residue buildup․ Regularly empty and clean the chamber to maintain hygiene and prevent bacterial growth, ensuring optimal performance with each use․
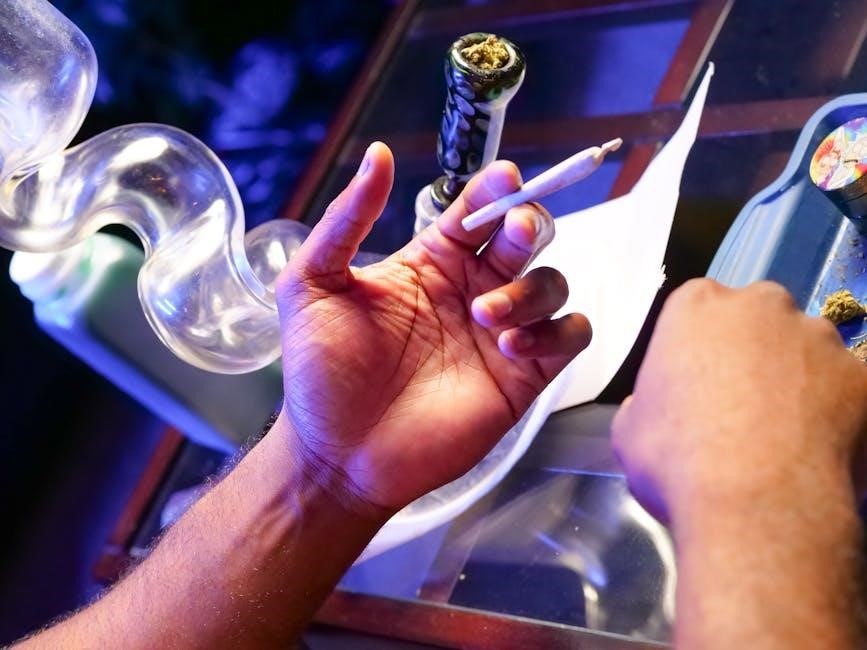
The Bowl: Where the Herb is Placed
The bowl is where you place your herb or concentrate, serving as the starting point for the smoking process․ Properly packing the bowl is essential for even combustion․ Grind your herb to a medium consistency and fill the bowl without overpacking, as this can restrict airflow․ For concentrates, ensure you have the correct banger attachment․ The bowl’s design allows for efficient heating and airflow, ensuring a smooth smoking experience․ Keeping it clean and free of residue is crucial for maintaining flavor and functionality․ Regularly sanitize the bowl to prevent buildup and bacteria growth․
The Downstem: Connecting the Bowl to the Water
The downstem is a vital component that connects the bowl to the water chamber, enabling smoke to pass through the water for filtration․ It ensures proper airflow and helps cool the smoke before inhalation․ The downstem’s design and size can significantly impact the smoothness of the hit․ Ensure it is securely fitted to avoid leakage and maintain even airflow․ Regular cleaning of the downstem is essential to prevent residue buildup and maintain optimal performance․ A clean, well-functioning downstem enhances the overall smoking experience․
The Mouthpiece: For Inhaling the Smoke
The mouthpiece is the point where you inhale the smoke, designed for comfort and ease of use․ It is typically made from durable materials like glass or silicone, ensuring a smooth and clean draw․ The mouthpiece should fit comfortably to your lips, allowing for unrestricted airflow․ For optimal hygiene, it can be removable and washable․ Proper cleaning of the mouthpiece prevents residue buildup and maintains a fresh smoking experience․ A well-designed mouthpiece enhances the overall functionality and enjoyment of your power bubbler bong․
Auto-Draw Technology: Hands-Free Operation
Auto-draw technology in power bubbler bongs enables a hands-free smoking experience, eliminating the need for manual operation․ This innovative feature allows users to inhale effortlessly, as the device automatically regulates airflow․ The technology often includes sensors or mechanisms that trigger the draw when you inhale, ensuring a smooth and consistent hit․ This feature is particularly convenient for beginners, as it simplifies the process and delivers a seamless smoking experience․ The hands-free operation enhances convenience, making it ideal for both casual and frequent use․
Setting Up Your Power Bubbler Bong
Setting up your power bubbler bong involves filling the chamber with water, packing the bowl with herb, and ensuring all components are properly connected for smooth functionality․
Filling the Chamber with Water
Filling the chamber with water is essential for optimal performance․ Hold the bong upright and pour water into the reservoir until the downstem is submerged․ Avoid overfilling to prevent water from splashing into the mouthpiece․ Gently swirl the bong to ensure even distribution․ Use filtered or distilled water for a cleaner taste and reduced residue buildup․ Proper water levels ensure smooth filtration and cooler hits, enhancing your overall smoking experience․
Packing the Bowl with Herb

Packing the bowl with herb is a crucial step for optimal performance․ Grind your herb to a medium consistency and gently place it into the bowl․ Avoid overpacking, as this can restrict airflow․ For concentrates, ensure you have the appropriate banger attachment․ Proper packing ensures efficient airflow and an even burn, leading to a smooth and enjoyable smoking experience․ Use a medium consistency grind for the best results․ This step is essential for achieving the perfect hit with your power bubbler bong․
Preparing for Use: Ensuring Proper Functionality
Before using your power bubbler bong, ensure all components are properly prepared․ Fill the chamber with water to the recommended level, submerging the downstem but avoiding overfilling․ Gently swirl the bubbler to distribute water evenly․ Check the downstem and bowl for blockages to ensure smooth airflow․ Inspect all connections for a secure fit to prevent leaks․ Finally, take a test draw without igniting the herb to confirm everything is functioning correctly․ This preparation ensures a seamless and enjoyable smoking experience․

Using the Power Bubbler Bong
Ignite the herb, inhale smoothly through the mouthpiece, and manage airflow via the carb hole for a controlled, enjoyable smoking experience with optimal flavor and comfort․
Step 1: Igniting the Herb
Light the herb evenly with a flame, ensuring consistent burning․ Hold the lighter close to the bowl, gently heating the material․ Avoid overheating to preserve flavor and prevent harsh hits․ Use a steady motion to cover the entire surface for an even burn․ This step ensures smooth smoke production and a satisfying experience when using your power bubbler bong․
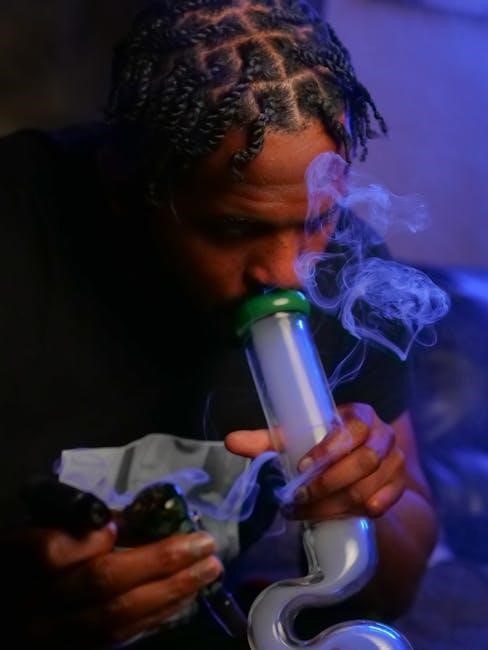
Step 2: Inhaling Through the Mouthpiece
Place your lips on the mouthpiece and gently inhale․ Start with a slow, steady breath to draw the smoke through the water chamber․ As you inhale, the water will bubble, filtering and cooling the smoke․ Continue until you’ve inhaled the desired amount․ For devices with auto-draw technology, simply inhale without pressing any buttons․ This step ensures a smooth and flavorful hit, enhancing your overall smoking experience with the power bubbler bong․
Step 3: Managing the Carb Hole
Once the herb is lit, cover the carb hole with your finger to trap smoke in the chamber․ Inhale slowly, allowing the smoke to accumulate․ When ready, release the carb hole to clear the chamber in one smooth breath․ Proper carb hole management ensures efficient airflow, maximizing the potency of your hit․ This step is crucial for achieving a balanced and satisfying smoking experience with your power bubbler bong․
Step 4: Exhaling and Enjoying the Hit
After releasing the carb hole, gently exhale to fully experience the smooth, filtered smoke․ Take a moment to appreciate the effects before considering another hit․ Proper exhaling ensures you maximize the session’s benefits․ Remember to exhale away from others and open windows if needed to prevent smoke buildup․ This step completes the process, allowing you to fully enjoy the experience your power bubbler bong provides․
Using the Power Bubbler Bong for Concentrates
For concentrates, attach the banger, heat it with a torch, and place the concentrate inside․ Inhale smoothly as the vapor flows through water, delivering a clean hit․ The auto-draw feature enhances convenience, allowing hands-free operation for an enjoyable experience with concentrates․
Preparing the Banger for Concentrates
Attach the banger to your power bubbler, ensuring a secure fit․ Preheat it with a torch until it reaches the desired temperature for your concentrate․ Use a dab tool to carefully place the concentrate in the banger․ Cover it with a carb cap to control airflow and vaporize evenly․ Proper preparation ensures smooth, flavorful hits and prevents waste․ Always test the banger’s temperature before adding concentrates to avoid overheating․ This step is crucial for achieving the best results with your power bubbler;
Heating the Banger
Use a torch to heat the banger evenly until it reaches the desired temperature for your concentrate․ For quartz or ceramic bangers, heat for 30-45 seconds․ Once glowing red, reduce the flame to maintain heat without overheating․ Use a carb cap to trap heat and ensure even vaporization․ Always preheat the banger before adding concentrates to prevent waste․ Proper heating ensures a smooth, flavorful hit․ Test the temperature by flicking the banger lightly with your fingernail to avoid overheating․ This step is crucial for achieving the perfect vaporization of your concentrate․
Placing the Concentrate
Once the banger is heated, carefully place a small amount of concentrate in the center using a dab tool․ Avoid overfilling to prevent waste․ Gently scrape the concentrate off the tool and ensure it’s evenly distributed in the banger․ Cover the banger with a carb cap to trap heat and promote even vaporization․ Use the cap to control airflow for optimal flavor and vapor production․ Always handle the heated banger with care to avoid burns․ This step ensures a clean and efficient vaporization process for your concentrate․
Inhaling the Vapor
Once the vapor begins to form, gently inhale through the mouthpiece while listening to the soothing bubbling sound․ Maintain a steady pace to ensure smooth vapor flow and avoid overheating the concentrate․ Cover the carb hole to control airflow and enhance vapor production․ As you inhale, the water filtration cools and filters the vapor, delivering a clean and flavorful hit․ Experiment with your inhale speed to achieve the perfect balance of vapor thickness and flavor․ This step ensures an enjoyable and satisfying experience with your power bubbler bong․
Maintenance and Cleaning
Regular cleaning ensures optimal performance․ Empty water after use, clean with isopropyl alcohol, and rinse thoroughly․ Dry all parts to prevent residue buildup and maintain hygiene․
Cleaning the Chamber
Cleaning the chamber is essential for maintaining your power bubbler bong’s performance․ Start by emptying the water and rinsing with warm water to remove residue․ Use a soft brush to scrub the interior, ensuring all surfaces are clean․ For tougher buildup, mix equal parts water and white vinegar, soak for 30 minutes, then rinse thoroughly․ Regular cleaning prevents bacterial growth and keeps your bong functioning smoothly․ Always dry the chamber after cleaning to avoid water spots and mineral deposits․
Sanitizing the Bowl and Downstem
Sanitizing the bowl and downstem is crucial for maintaining hygiene and preventing residue buildup․ Soak both pieces in a mixture of 99% isopropyl alcohol and water for 15-20 minutes․ Use a soft-bristled brush to scrub away any stubborn residue․ Rinse thoroughly with warm water to remove any alcohol taste or residue․ For tougher stains, let them soak longer or repeat the process․ Regular sanitization ensures a cleaner smoking experience and prolongs the life of your power bubbler bong․

Drying the Bong After Use
After cleaning, thoroughly dry your power bubbler bong to prevent water spots and bacterial growth․ Use a clean, lint-free cloth to wipe down all parts, paying extra attention to crevices․ Allow the device to air dry completely, ensuring no moisture remains․ Regular drying helps maintain functionality and hygiene, ensuring your bong is ready for the next use․ Store it in a dry, cool place to preserve its condition and performance․
Troubleshooting Common Issues
Common issues include water not bubbling properly, restricted airflow, or a leaking chamber․ Regular cleaning and adjusting connections can resolve most problems․ Ensure all parts are secure and functioning smoothly for optimal performance․
Water Not Bubbling Properly

If the water in your power bubbler bong isn’t bubbling, check the water level and ensure the downstem is fully submerged․ Insufficient water or a clogged downstem can disrupt airflow․ Clean the downstem and bowl regularly to remove residue․ Gently shake the bong to ensure water flows freely․ If issues persist, inspect for blockages in the downstem or mouthpiece․ Proper maintenance and regular cleaning will help restore smooth bubbling and optimal performance․ Always use filtered water to prevent mineral buildup and ensure consistent operation;
Restricted Airflow
Restricted airflow in a power bubbler bong can hinder the smoking experience․ Check for clogs in the downstem or bowl, as residue buildup often blocks airflow․ Ensure the bowl isn’t overpacked, as this can restrict smoke flow․ Clean the mouthpiece and carb hole regularly to maintain proper ventilation․ If issues persist, inspect for blockages in the downstem or mouthpiece․ Regular cleaning and maintenance can prevent airflow restrictions, ensuring smooth hits and optimal performance․ Always ensure all parts are clear and functioning properly for the best experience․
Leaking Water Chamber

A leaking water chamber in a power bubbler bong can disrupt your smoking experience․ Inspect the connections between the chamber and other components for loose seals or misalignment․ Check for cracks or damage in the glass or rubber gaskets, as these can cause leaks․ Ensure all parts are tightly fitted and replace any worn-out seals․ If the issue persists, consider using a silicone-based sealant for added security․ Regular maintenance and inspections can help prevent leaks, ensuring a smooth and enjoyable session every time․
Accessories for Enhanced Experience
Enhance your power bubbler bong experience with essential accessories like a banger for concentrates, a carb cap for airflow control, and replacement parts for maintenance․ Cleaning kits and upgraded mouthpieces also improve functionality and hygiene, ensuring a smoother and more enjoyable session․
Banger and Cap for Concentrates
A banger and cap are essential for using concentrates with your power bubbler bong․ The banger is heated with a torch to vaporize the concentrate, while the cap controls airflow for even heating․ This setup ensures optimal vaporization and flavor preservation, enhancing your concentrate experience․ The cap also prevents splatter and allows for precise temperature control, making it a must-have accessory for dab enthusiasts․ It’s designed to fit seamlessly with your bong, providing a smooth and efficient way to enjoy concentrates․
Carb Cap for Better Airflow Control
A carb cap is a small, rounded tool designed to enhance airflow control during your smoking sessions․ Placing it over the carb hole allows you to regulate the amount of air entering the chamber, ensuring a smoother and more consistent burn․ This accessory is particularly useful for managing the intensity of your hits and preventing overheating․ By controlling airflow precisely, the carb cap helps maximize flavor and efficiency, making it an essential addition for optimizing your power bubbler bong experience․
Replacement Parts
Replacement parts are essential for maintaining the functionality and longevity of your power bubbler bong․ Common replacements include the bowl, downstem, and mouthpiece, which may wear out over time․ These parts are easily available from manufacturers or online retailers, ensuring your device continues to perform optimally․ Upgrading or replacing these components can also enhance your smoking experience by improving airflow or flavor․ Keep spare parts on hand to avoid interruptions and maintain the smooth operation of your power bubbler bong for years to come․

Safety Tips
- Always handle electrical components with care to avoid shocks or malfunctions․
- Avoid overheating the device, as it can damage the bong or cause burns․
- Store the bong in a safe, dry place out of children’s reach․
Handling Electrical Components
When handling the electrical components of your power bubbler bong, ensure they are dry and free from water exposure to prevent short circuits or electrical shocks․ Avoid touching any live wires or components while the device is in operation․ Regularly inspect cords and connectors for damage, and replace them immediately if worn or frayed․ Keep the power source away from flammable materials and never leave the device unattended while it is operational․ Always follow the manufacturer’s guidelines for safe usage and maintenance to ensure reliability and longevity․ Proper care extends the life of your bong and enhances safety․
Avoiding Overheating
To prevent overheating, monitor the temperature during use and take regular breaks to allow the device to cool down․ Ensure proper airflow by keeping the carb hole unobstructed and avoiding clogged chambers․ Use the correct heating levels for your material, whether herbs or concentrates, to avoid excessive heat buildup․ Store the bong in a cool, dry place and avoid direct sunlight exposure․ Never touch hot components during or immediately after use․ Always follow the manufacturer’s guidelines for safe temperature ranges to maintain device longevity and user safety․
Storing the Bong Safely
Store your power bubbler bong in a cool, dry place to avoid moisture buildup and potential damage․ Clean and dry the device thoroughly before storage to prevent residue and mold growth․ Use a protective case or pouch to shield it from scratches and breakage․ Keep it away from direct sunlight, as UV rays can degrade materials over time․ For added security, consider using a lockbox to prevent unauthorized access․ Always inspect the bong for damage before and after storage to ensure optimal performance․
A power bubbler bong offers a seamless blend of portability and smooth, water-filtered hits․ Its ease of use, durability, and versatility make it a top choice for enthusiasts seeking a high-quality smoking experience․
Final Thoughts on Using a Power Bubbler Bong
Using a power bubbler bong is an excellent way to elevate your smoking experience․ Its portability, combined with the smooth hits of water filtration, makes it ideal for both herbs and concentrates․ The auto-draw technology simplifies the process, allowing for hands-free operation․ Regular maintenance ensures optimal performance, while accessories like bangers and carb caps enhance functionality․ Whether you’re a seasoned user or new to smoking devices, the power bubbler bong offers a convenient, flavorful, and enjoyable experience․ Proper care and usage will extend its lifespan, providing countless satisfying sessions․
Encouragement for Proper Usage and Maintenance
Proper usage and maintenance of your power bubbler bong are crucial for ensuring smooth, flavorful hits every time․ Regular cleaning and drying prevent residue buildup and extend the life of your device․ By following these simple steps, you’ll enjoy a cleaner, more satisfying smoking experience․ Explore accessories like bangers and carb caps to further enhance your sessions․ Taking care of your bubbler ensures convenience and performance, making each use a pleasure․ Keep it well-maintained and enjoy the benefits of a superior smoking experience consistently․
Additional Resources
Explore video tutorials and step-by-step guides for mastering your power bubbler bong․ Find additional resources, including buying guides and maintenance tips, to enhance your experience․
Recommended Reading for Further Learning
For a deeper understanding, explore detailed guides on power bubbler bongs, including troubleshooting tips and advanced techniques․ Check out tutorials on maintaining and cleaning your device for optimal performance․ Discover step-by-step instructions for using concentrates and herbs effectively․ Find resources on choosing the right accessories and understanding auto-draw technology․ These materials will help you master your power bubbler bong and enhance your smoking experience through informed practices and expert advice․
Video Tutorials for Visual Learners
Visual learners can benefit from watching video tutorials that demonstrate how to set up, use, and maintain a power bubbler bong․ These videos provide step-by-step instructions, showcasing techniques for filling the chamber, packing the bowl, and operating the auto-draw feature․ They also cover troubleshooting common issues and cleaning methods․ By following along with these visual guides, users can gain a clearer understanding and confidence in using their power bubbler bong effectively, ensuring a smooth and enjoyable experience every time․